High Bay vs Low Bay Lights: Which Fits Your Garage? (November 2026)
Choose high bay lights for tall, open spaces and lower-output, distributed fixtures for lower ceilings. The high bay vs low bay lights decision depends on mounting height, glare and where you need light.
On this page (10 sections)
- High bay vs low bay lights: which fits your garage?
- What changes between high bay and low bay lighting?
- Which ceiling layout suits each type?
- Who should choose each of these products?
- How do brightness, beam angle and color affect the choice?
- How can you reduce glare and shadows?
- What should you check before installation?
- How should you care for garage ceiling lights?
- Which mistakes lead to the wrong lighting setup?
- How should you decide between high bay vs low bay lights?
High bay vs low bay lights: which fits your garage?
Choose high bay lights for tall, open garages and a distributed, lower-output layout for lower ceilings. In the high bay vs low bay lights decision, mounting height and the location of your work matter more than fixture shape.
A bright UFO fixture can cover an open bay from above. Several linear shop lights give you more places to put light around benches, shelves and parked vehicles.
The 3 products below represent those approaches. The Hykolity fixtures are linear shop lights, not dedicated commercial low bay fixtures, but they offer a practical option for lower garage ceilings.
For a full plan that includes ceiling lights and task lighting, start with our complete garage and workshop lighting guide.

 Best for lower garage ceilings
Hykolity 4FT Linkable LED Shop Lights 10-Pack
What changes between high bay and low bay lighting?
The main difference is the distance between the fixture and the work surface. High bay fixtures serve greater mounting heights, while low bay layouts distribute light from closer overhead positions.
As a beam travels farther, it spreads across a larger area. A tall installation therefore needs enough output and suitable beam control to keep useful light on the floor and benches.
Closer to the ceiling isn't always better for a fixture, either. Hanging a high-output light lower reduces its coverage area and brings the bright source nearer your eyes.
There is no single ceiling-height cutoff that suits every fixture. Use the manufacturer's recommended mounting range and layout guidance for the exact model.
Also measure the finished mounting height, not just roof height. A light suspended below a tall roof can end up much closer to your work than the building's dimensions suggest.
High bay vs low bay lights in a divided garage
Choose each zone separately when ceiling heights or tasks differ. A tall vehicle bay and a lower bench area don't need identical fixtures.
High bays can handle the open center, while linear lights serve the bench and storage edges. Separate controls let you light the area you're using without switching on every fixture.
Which ceiling layout suits each type?
Use high bays where light can spread through open space, and linear fixtures where you need several light sources around obstacles. Ceiling height starts the decision; the room's shape finishes it.
An open rectangular shop is easier to cover from a few overhead positions than a garage divided by beams, shelving and door tracks. Those obstacles can block a bright fixture just as readily as a modest one.
For a lower ceiling, surface-mounted linear lights preserve headroom. Hanging fixtures may help you position light below an obstruction, but they also reduce clearance.
Sketch the ceiling with garage doors fully open. Mark tracks, the opener, loft edges, ducts and any moving equipment before drawing fixture locations.
Then mark where people stand and work. Put useful light beside or around those positions so your body doesn't cast a shadow directly onto the project.
A light centered over a parked vehicle may illuminate its roof while leaving the bench beside it dim. Additional brightness from the same position won't solve that blocked path.
Who should choose each of these products?
Choose Sunco for a large high bay layout, Hykolity for distributed lower-ceiling lighting, or Hyperlite for a smaller high bay pack with ring-hook mounting. Buy the quantity your layout needs, rather than designing around a multipack.
Sunco: for large, tall garages with varied mounting needs
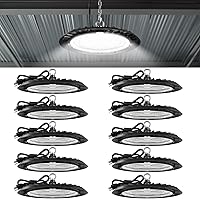
The Sunco pack suits a large garage or workshop where several high-output fixtures have clear paths to the work areas. It offers hook, ceiling and ⅜-inch NPT pole mounting.
Each fixture produces 19,500 lumens at 150W, with a 110-degree beam. The pack contains 10 fixtures, so plan positions and electrical load before deciding that the full set belongs in one room.
Sunco specifies an IP65 wet-rated housing, which matters for locations exposed to dust and moisture. The suitability of outlets, connections and mounting hardware still needs separate attention.
Skip this pack for a small, low garage or a space where you want to reduce brightness with a dimmer. These fixtures are non-dimmable, so position and switching zones must do that work.
Hykolity: for lower ceilings and separate work zones
The Hykolity pack suits garages where several light positions are more useful than a few intense overhead sources. Its 4-foot fixtures can hang from included chains or mount directly with included screws.
Each fixture delivers 4,400 lumens at 42W. Up to 6 can link together, allowing a row above a bench or a run along a parking bay.
The open-frame design has no plastic cover. Keep it accessible for cleaning, and choose installation locations appropriate for an indoor fixture.
Skip it for a plan that depends on all 10 lights sharing one linked run. Also choose a dedicated high bay layout when tall mounting positions call for concentrated overhead output.
Hyperlite: for tall indoor shops with overhead mounting points
The Hyperlite pack suits an indoor shop that needs fewer high bay fixtures than the Sunco pack contains. Each of its 6 fixtures matches Sunco's output and wattage, with a wider 120-degree beam.
A suitable ring-hook mounting point is central to this choice. Its plug-in connection helps with setup when power is already available overhead.
Skip it when your plan requires direct surface mounting or an outdoor installation. Resolve the mounting arrangement before buying, rather than assuming any ceiling attachment will work.
For other fixtures in this category, see our best LED high bay lights guide. Our best garage lights guide covers more styles for mixed ceiling heights and tasks.
How do brightness, beam angle and color affect the choice?
Compare light at the work surface, not just total lumens. Output tells you how much light a fixture emits, while height, beam spread and obstacles determine where it goes.
A wider beam can spread light farther sideways at the same mounting height. It doesn't automatically produce a brighter floor or eliminate shadows.
The two high bay choices illustrate that tradeoff: their output is equal, but their beam angles differ. Use layout guidance to decide which spread suits your mounting positions and room edges.
Lumens and lux also answer different questions. Lumens measure emitted light; lux measures how much light reaches a surface.
A fixture count based only on floor area can miss a bench hidden under shelving. Plan general lighting first, then add local task lighting where the work needs it.
All 3 choices use 5000K daylight. Color temperature describes the light's appearance, not its brightness, so a higher Kelvin number isn't a substitute for enough light.
For help choosing a consistent appearance across ceiling and task lights, read our garage lighting color temperature guide.
How can you reduce glare and shadows?
Reduce glare by keeping bright sources away from common sight lines and choosing suitable mounting heights. Reduce shadows by lighting work areas from more than one direction.
Check the view from your bench, doorway and usual walking routes. Also consider tasks that involve looking upward, such as working beneath an open hood or beside a vehicle lift.
Shiny floors, polished metal and glossy worktops can reflect bright fixtures into your eyes. Move the planned light position if the reflection falls directly where you'll look.
A broad beam helps spread light, but it doesn't hide the light source. Don't treat beam width as a glare-control feature.
For benches, avoid placing the only light directly behind your standing position. A ceiling fixture closer to the work surface, plus task lighting where needed, can keep your shoulders from blocking the light.
Use our guide to spacing LED shop lights to plan overlapping coverage. Even spacing should serve the room's work zones, rather than form a neat grid that leaves important surfaces dark.
What should you check before installation?
Check structural support, cord reach, clearance and electrical capacity before mounting anything. A plug-in fixture still needs secure support and a suitable power source.
Sunco includes a 5-foot cord for a 120V outlet. Hyperlite includes a 6-foot 120V cord, while Hykolity includes a 59-inch cord with an on/off switch.
Measure the actual cable route along the ceiling. Straight-line distance can be misleading when a beam or door track forces the cord around an obstacle.
Support the fixture with hardware suitable for its weight and the ceiling structure. Never suspend it by its power cord or attach it casually to a garage door track.
For the Hykolity pack, split the full set into compliant runs because the linking limit is 6 fixtures. Linking reduces separate plug connections, but every connected fixture still adds electrical load.
Plan switch access, too. An inline switch near the ceiling may be awkward to reach unless the power arrangement gives you a practical way to control that zone.
Add fixture wattages and account for other equipment on the circuit. Use a qualified electrician for new outlets, wiring or questions about circuit capacity.
Before finishing, check door travel, lift movement and access for future cleaning. Our guide to hanging LED shop lights explains the mounting steps in more detail.
Before you buy or install, look up the exact model on the CPSC recall list at cpsc.gov. Several high bay fixtures sold through distributors since 2024 were recalled because plastic pins could let the LED board fall.
How should you care for garage ceiling lights?
Keep fixtures clean, securely mounted and easy to inspect. Dust on light-emitting surfaces reduces useful output, while blocked housing surfaces can interfere with heat release.
Switch off power and let fixtures cool before cleaning. Follow the manufacturer's cleaning instructions, and avoid spraying cleaner into electrical parts or connections.
Use safe access equipment for overhead work. If a fixture is too high to reach safely, arrange suitable access rather than stretching from an unstable position.
Periodically check mounts, cords and plug connections for damage. Keep stored items away from fixtures and avoid routing cords where doors or tools can pinch them.
If the room seems dimmer, inspect for dirt, new shelving and changed work positions before adding more lights. The light path may have changed even when the fixtures haven't.
Which mistakes lead to the wrong lighting setup?
The biggest mistake is buying maximum output before planning coverage. A bright center with dark edges can be less useful than several well-placed lights.
- Using the whole pack by default: Buy for the layout, and don't assume every included fixture must go into one garage.
- Choosing by wattage alone: Wattage measures power use, not the light reaching your project.
- Ignoring open garage doors: A raised door can block overhead light during the hours you use the garage most.
- Expecting ceiling lights to reach everywhere: Shelves, cabinets and vehicles can require separate task lighting.
- Assuming a dimmer will fix excess brightness: Confirm compatibility first, especially with the non-dimmable Sunco fixtures.
- Ignoring service access: Leave a workable way to clean or replace fixtures after installation.
Avoid spacing fixtures solely by appearance. Draw the coverage around your actual tasks, then check for gaps at benches, storage aisles and entry points.
How should you decide between high bay vs low bay lights?
Choose Sunco when a large, tall space needs multiple mounting options, or Hyperlite when a 6-fixture indoor high bay plan fits your overhead supports. Choose Hykolity when lower ceilings and separate work zones favor distributed linear lights.
If the garage combines a tall central bay with lower side areas, use different fixtures for those zones. Consistent light color and sensible controls can make that mixed layout practical.
Before ordering, write down mounting height, fixture positions, outlet routes and the number of lights each zone needs. If those details aren't settled, the pack size shouldn't settle them for you.
Finish your high bay vs low bay lights plan with our garage lumen guide. Use it to set brightness around room size and tasks, then confirm coverage for the fixtures you choose.
Frequently asked questions
What is the difference between high bay and low bay lights?
High bay lights serve taller mounting positions, while low bay lights serve lower ceilings; high bays commonly concentrate substantial output into overhead fixtures, while lower-ceiling layouts often spread light among several sources. Choose by actual mounting height, beam pattern and work-surface brightness, rather than relying on the bay label alone.
Can you use high bay lights in a garage?
Yes, high bay lights suit garages with tall, open ceilings and enough space for their beams to spread; check mounting height, glare, power access and obstructions before choosing locations. For a low residential ceiling, several lower-output shop lights usually offer more useful placement options around vehicles and benches.
Are low bay lights better for a low garage ceiling?
Usually, a lower-output layout is easier to manage under a low ceiling because the fixtures sit close to your eyes and projects; linear shop lights can distribute illumination across the room. Still check direct glare, door clearance and shadows, since the low bay label alone doesn't ensure a comfortable layout.
How many high bay lights does a garage need?
The count depends on floor area, mounting height, target brightness and the fixture's light distribution; map benches, vehicles, shelves and walking routes before settling on a quantity. Use manufacturer layout guidance to check coverage, and avoid treating the number of lights in a multipack as the number your garage needs.
Can high bay and low bay lights be mixed?
Yes, use high bays over a tall open bay and lower-mounted fixtures around benches or lower sections of the building; match color temperature where practical, and plan separate controls for different tasks. Check the transition between zones so you don't create a dark walkway beside a brightly lit work area.